Thursday, 24 November 2011
Thursday, 27 October 2011
GRC 5.3 Create Password Self Service
GRC 5.3 - Create Password Self Service with Challenge Response with the following steps:
- GRC > CUP > Configuration > Self Service >
- Authentication Source : Challenge Response

- Select Service to Disable Verification: None

- Scroll down > Create > Now add your questions > Save

- Repeat step 4 for other questions

- Change >
Number of questions End User has to register : 2
Number of unsuccesful attempts after which user is locked: 3
The above value is up to your to define
- To make PSS link visible at main AE page > CUP > Configuration > Request form Customization
- Check password self service > Change > Visible : Yes > Save

- Its visible now

- CUP > Configuration > Connectors > Look for existing connectors > Change PSS to Enable

- If you failed to perform step 10, you will not see the child system when requesting for password reset
- CUP > Configuration > Workflow > CUA SYSTEM > Create / Change to ensure you identify child - parent relationship of your CUA systems.

SCUM SETTINGS - LOGON DATA TAB
SCUM SETTINGS - LOGON DATA TAB has the following settings as below:
Global
|
You can only maintain the data in the central system. The data is then automatically distributed to the child systems. These fields do not accept input in the child systems, but can only be displayed.
All other fields that are not set to “global” accept input both in the central and in the child systems and are differentiated only by a different distribution after you have saved.
|
Proposal
|
You maintain a default value in the central system that is automatically distributed to the child systems when a user is created. After the distribution, the data is only maintained locally, and is not distributed again, if you change it in the central or child system.
|
RetVal
|
You can maintain data both centrally and locally. After every local change to the data, the change is redistributed to the central system and distributed from there to the other child systems.
|
Local
|
You can only maintain the data in the child system. Changes are not distributed to other systems.
|
Everywhere
|
You can maintain data both centrally and locally. However, only changes made in the central system are distributed to other systems, local changes in the child systems are not distributed.
|
Wednesday, 19 October 2011
SAP SECURITY EXPORTING USER EMAIL
To extract user's email, you may search from table USR21 and ADR6
- SE16 > USR21 and enter user ID
- Copy the PERNR (personal number)
- SE16 > ADR6 and paste the PERNR
- You will get a list of email addres
Alternatively, you may replace Table ADR6 with PA0105 but this table only exist in HR system.
Sunday, 9 October 2011
GRC does not process report real time. It has to be schedule as a job for RAR reporting to work.
- Schedule USER, ROLE, PROFILE SYNCHRONIZATION. This job is used for Batch Risk Analysis job later for reporting
- GRC > CONFIGURATION > SCHEDULE JOB > Check only the 3 below > Then click schedule button at the bottom

- Give a Job name > You may specify any options you like > Click Schedule. In our case, it will run weekly starting from 6th Oct 2011

- Now schedule a new job > Select the 4 check box below > Click Schedule at the bottom

- Same as before, just specify a job name and any option you like. Now click schedule again.

- To check if the job you schedule is ready or running, just click "SEARCH"
- Then enter the search criteria and result will show as below:

Wednesday, 5 October 2011
SAP SECURITY : GRC maintaining Workflow CUA system
CUA system must also be maintain in front end GRC - not just back end ABAP CUA system.
Tuesday, 4 October 2011
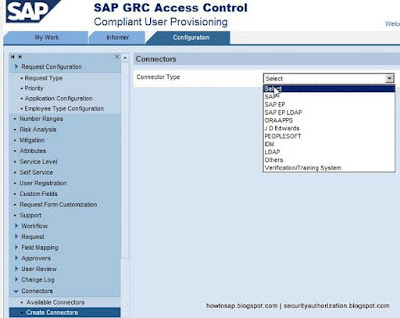
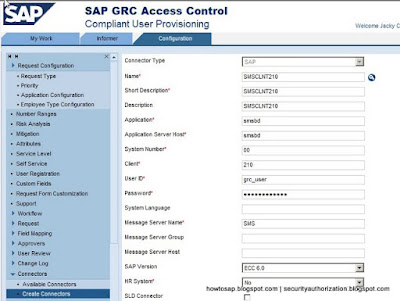
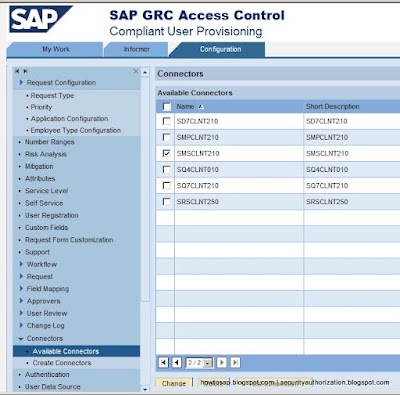
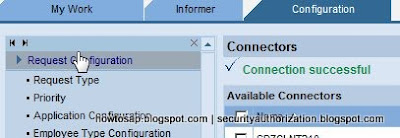
SAP AUTHORIZATION - GRC Creating new connector
Connector in GRC like ABAP RFC. Connector is used to connect front end GRC to the backend ABAP system.
Monday, 3 October 2011
System Log for GRC
It could be found here:
OS LEVEL:
usr\sap\SID\JC00\j2ee\cluster\server0\apps\sap.com\grc~aeear\servlet_jsp\AE\root\logsAE
Or GRC > Configuration > Monitoring > System Log
logsAE/logger.log
OS LEVEL:
usr\sap\SID\JC00\j2ee\cluster\server0\apps\sap.com\grc~aeear\servlet_jsp\AE\root\logsAE
Or GRC > Configuration > Monitoring > System Log
logsAE/logger.log
Monday, 26 September 2011
SNC FRONTEND SETTINGS
- SAP Logon > Right Click any entries > Properties
- Network Tab > Check Activate Secure Network Communication
- SNC Name > p:SAPServiceSID@domain.com
- OK
Tuesday, 13 September 2011
SAP SECURITY INTERVIEW - CUA - USLA04 TABLE TO CHECK USER ROLE ASSIGNMENT
If you are using CUA and would like to search for Roles assigned to user, you may try
Monday, 5 September 2011
SAP SECURITY - MASS CHANGE USER LICENSE VIA SU10
- SU10 > Authorization Data > User > Multiple Selection

- Choose copy from txt file (if you have it in txt format) or clip board (if you click copy paste)

- Click Copy and it will bring you back to previous screen
- Click Execute
- Select All user

- Click Transfer

- You will get back to SU10 main screen again
- Click Change

- License data Tab > Select your desired user license from drop down list
- REMEMBER TO CHECK "CHANGE"

- Now Save and continue
- Once finish, log will be displayed for your reference
Thursday, 1 September 2011
Organizational Level
ARBPL Work Center
PLVAR Plan Version
KOKRS Controlling Area
BUKRS Company Code
PRCTR Profit center
IWERK Planning Plant
SWERK Maintenance Plant
EKGRP Purchasing Group
EKORG Purchasing Org.
WERKS Plant
VKORG Sales Organization
VTWEG Distribution Channel
SPART Division
VSTEL Shipping Point
LGORT Stor. Loc.
BERID MRP Area
ST01 return codes
ST01 return codes
0 Auth check passed
1 No auth
2 Too many parameters for auth check
3 Object not contained in user buffer
4 No profile contained in user buffer
6 Authorization check incorrect
7,8,9 Invalid user buffer
0 Auth check passed
1 No auth
2 Too many parameters for auth check
3 Object not contained in user buffer
4 No profile contained in user buffer
6 Authorization check incorrect
7,8,9 Invalid user buffer
Thursday, 25 August 2011
SAP SECURITY INTERVIEW - BEST PRACTISES
TAKEN FROM
http://sapideas.blogspot.com/2011/06/implemantation-of-sap-security-for.html
Implemantation of SAP security for a public sector organization: Part I
Summary:
This document presents the technical recommendations and improvement opportunities based on a review of the Large Public Sector Security Framework, the Organizational job role definition and requirements. It is assumed that the organization will develop or contract knowledge security resource(s) to execute the recommendations. Out of the list of thirteen (13) recommendations, recommendation 1, 2, 3, 5, 6, 9, 11, and 14 should be reviewed first.
Recommendation 1: Three best practices should be documented in the security framework and be followed to optimize security role design.
1. The same transaction code should not appear in more than one core functional role. This design principle minimizes transaction code redundancies. It decreases risk of inconsistent access privileges for common transactions. One adjustment to a role is automatically activated for all assigned users or positions.
2. Core functional roles should contain a small set of related transactions in a sub business process area. Core functional roles should be task orientated rather than job orientated. This approach decreases turnaround time for design and build of roles. Code changes at the role level involve less clean up because the roles are smaller. Code adjustments occur less often because many functional design changes only require remapping of roles to position or users.
3. Within a functional role there should be no SOD (segregation of duties). When the roles are combined and assigned to the users / positions, in some instances, SOD has to exist because the conflicting tasks cannot be separated.
Attached are examples of core functional role design matrixes:
Recommendation 2: The Organization may consider the use of value activity groups (also referred to as organizational roles) to facilitate roll out of security roles globally.
Value Activity Groups vs. Master and Derived roles
The Organization’s Security Framework discussed the use of “master” and “derived” roles for global roll out. The approach of creating master (also referred as Template roles), and then derive the master roles into children roles with different organization attributes can meet the requirements. However, one important goal of an organization in its security design is to minimize the number of roles in the system. With this consideration, the use of Value Activity Group will add efficiency and ease maintenance.
“Master” and “derived” roles approach is to first
1. Create the master roles (also referred to as the core functional roles) which contain the transactions necessary to perform a process. The required authorization objects and values are developed, with the exception of the Organization Level values. Organization Levels include such values as Company Code, Cost centers, Purchasing Organization, etc.
2. Then copies of this master role are “derived”. These derived roles contain not only the same transactions and authorization values as the master but also the Organization Level values.
The use of Value Activity Group approach is to first
1. Create the master roles (also referred to as the core functional roles) which contain the transactions necessary to perform a process. The required authorization objects and values are developed, with the Organization Level fields deactivated or blank.
2. Create small value activity groups (also referred to as organizational roles) which contain only organizational authorization objects and fields, such as company code, purchasing groups, business areas and associated activity codes…etc. These roles differ from the derived roles because they only contain a few applicable organizational objects and values. They are “small” and easy to maintain. In addition, derived roles are master role specific and are tied to a specific process or sub process areas. But value activity groups are independent of any master roles or process areas and can be combined with any core functional roles and assigned to users or positions.
For example, we would like to restrict five functional roles including Accounts Payable, Accounts Receivable, GL, Purchasing, and Sales roles based on business areas (for example, we have ten business areas). If we use the master and derived role approach, we will need to first create five master roles for AP, AR, GL, Purchasing and Sales. Then we will need to derive ten roles for AP, ten roles for AR, ten roles for GL, ten roles for purchasing and ten roles for Sales to restrict the master roles on the ten business areas. The total number of roles in this case will be fifty-five roles including five master roles and ten derived roles for each of the five master roles.
If we use value activity group approach, we still will have the five master roles (AP, AR, GL, Purchasing and Sales). But we will only need 10 value activity group (also referred to as organization roles) each contain one of the ten business areas. Then at the time of assignment, the appropriate value activity group contain a specific business area will be assigned to the users or positions in addition to the master roles. In this case the total number of roles is only 15 as compared to the 55 roles in the master and derived role scenario.
The more functionality and more organizational variations that are in scope, the more advantageous is it to use the value activity. The benefits of using value activity group are:
1. Significantly reduces the number of roles in the system
2. Reduces the size of the roles themselves
3. The approach is flexible and modular because the value activity groups (organizational roles) can be matched with many different master roles to create the necessary access mix. These value activity groups are different flavors that can be added to different master roles.
4. Change or additions to the value activity groups can be done independent of the master roles with minimum impact on any other roles. Therefore the implementation and maintenance effort is low with respect to any design change on the organizational attributes.
Attached is an example of how to define value activity groups:
Recommendation 3: The Organization may consider the use of position based security for assignment of the security roles.
Position Based Security vs. User Based Security:
Most of the Organizations currently uses user based security, which refers to the method of assigning security roles to a user ID.
Position based security refers to the method of assigning security roles to an org unit, job or position instead of assigned them to a user ID.
At you organization, an HR org structure is available, which allows security to leverage and assign users to an org attributes. Position based security reduces initial and ongoing administration effort. Since roles are not tied to a user, rather it is tied to a position the user(s) occupied, once a role is assigned to a position under the org structure, any users occupy that position will get the access. For example, if a user transfer from Position A to Position B, no role reassignment is necessary, because the roles are assigned to Position A and B, not to the user. When this transfer happens, the user moves in HR org structure from A to B, and will automatically get authorization which is assigned to Position B and relinquish old authorization from Position A.
In addition, position based security is easier to use with Workflow functionality:
In general, Workflow uses the organizational structure to identify approving positions; the position itself, not the holder of the position, drives the approval
Position-based security is similar to the position-focused Workflow (chief positions); everything is centered on positions.
Here is how to assign security roles to an attributes along the organizational structure:
In PFCG, security team will assign roles via the org mgmt tab,
, choose the org attributes from the org structure to which the role will be assigned. The role can be assigned to an org unit, a work center, a person, or a position.
However, for contractors, temporary employees who are not on the HR organizational structure, user based security will have to be applied for this subset of users.
Recommendation 4: To reduce number of roles in the system, The Organization may consider use of only virtual composite roles (job roles) rather than creating real composite roles (job roles) in the system.
Composite roles are containers of one or more core functional roles. Some disadvantages of creating actual composite roles in the system are:
1. Increase number of roles in the system.
2. Overtime, composite roles can lose its original definition when more single functional roles are added to the composite.
3. Composite roles can hide SOD (segregation of duties) issues because it is not transparent what actually are in the composites.
Virtual composite roles refer to the approach of maintaining a document with job (composite) role to core functional role mapping. But in the system, security administrator will directly assign those core functional roles to users or positions. In this case, virtual composite role serve only as an out of system reference for assignment.
Recommendation 5: It is very important to have good role naming convention from the start of the project. The Organization may consider adding a section in its framework to discuss its security role naming convention. The naming of the roles should be indicative of its functions and other attributes, such as organizational attributes. An example of a naming convention document is attached:
Recommendation 6: It is important to have a user strategy in the security framework/strategy document.
1. User mapping: User/Position mapping is the process of keeping parallel documentation on assignment of roles to users (e.g. an Excel matrix, or using an application such as SAP GRC Role Expert). User/Position mapping is a vital step in accurately determining user access to the SAP system, substantially decreasing the risk of inappropriate user access.
Below is an example:
The Process should be followed:
– Functional team leads map users/position to the core functional roles necessary to perform day-to-day business tasks.
– User maps should be forwarded to the security team by the functional teams in order to set up the user IDs accurately
– Segregation of duties analysis should be performed on a role and user level
2. User ID source and naming convention: One step in the user mapping process is to determine the user ID source and naming convention. One option for the organization to consider is to use network ID as SAP ID, making it easier for creating users and standardizing user naming across platform. When applicable, SAP can pull users IDs and other user information such as address data from LDAP (Active Directory). User ID and password policy should be defined in the security framework or strategy document.
3. User provision: The Organization should be starting the process of selecting and implementing user provisioning application.
Recommendation 7: The Organization may consider running SOD checks at different phases of its SAP implementation. During role design phase, SOD check should be performed at transaction level against the core functional roles defined. After the roles are built in the system, an SOD check should be performed on the roles in the Development box. The organization may request its GRC vendor to connect to the development box and perform the check. After unit testing, prior to the transport of the security roles to QA box, another check should be performed. After the roles are tested during integration testing and modifications are made, The organization may request its GRC vendor to connect to the QA box and run another SOD check. In the cutover plan there should be a step to perform an SOD check prior to transporting to production. In production, the GRC application’s productive instance should be connected to the SAP productive instance upon go live and checks be performed continuously.
Recommendation 8: Key security parameters should be reviewed and documented in the security strategy document and values approved for input in the system. Attached below is an example of the selected parameters and settings:
PARAMETER | PRD | QA | DEV |
login/failed_user_auto_unlock | 0 | 1 | 1 |
login/fails_to_session_end | 3 | 3 | 3 |
login/fails_to_user_lock | 5 | 5 | 5 |
login/min_password_diff | 3 | 0 | 0 |
login/min_password_digits | 1 | 0 | 0 |
login/min_password_letters | 1 | 1 | 1 |
login/min_password_lng | 7 | 7 | 7 |
login/min_password_specials | 0 | 0 | 0 |
login/no_automatic_user_sapstar | 1 | 1 | 0 |
login/password_change_for_sso | 0 | 0 | 0 |
login/password_change_waittime | 1 | 1 | 0 |
login/password_expiration_time | 60 | 90 | 90 |
login/password_history_size | 10 | 5 | 5 |
login/password_max_idle_initial | 3 | 6 | 6 |
login/system_client | Depends on SID | Depends on SID | Depends on SID |
rdisp/gui_auto_logout | 1,800 | 3,600 | 3,600 |
rdisp/max_wprun_time | 600 | 600 | 600 |
rdisp/max_alt_modes | 3 | 6 | 6 |
Subscribe to:
Comments (Atom)


